Friday, December 14, 2012

Gingerbread Blondies with Caramel Frosting

When I think of holiday baking, the first thing that comes to my mind is peppermint. Or chocolate and peppermint. But not white chocolate peppermint (which is what things always seem to be) because I despise white chocolate. But that's another story for another time.

Anyway, I love peppermint but there are so darn many peppermint recipes this time of year. I'll make them, I'll eat them, but sometimes I wanna mix it up.

So what's the second holiday flavor I think of? Gingerbread! I was brainstorming some unique ways to use gingerbread flavors when the idea for these popped into my head. I've never made blondies-because when brownies are so good why would I want to take out the chocolate-and these were an awesome first go round.

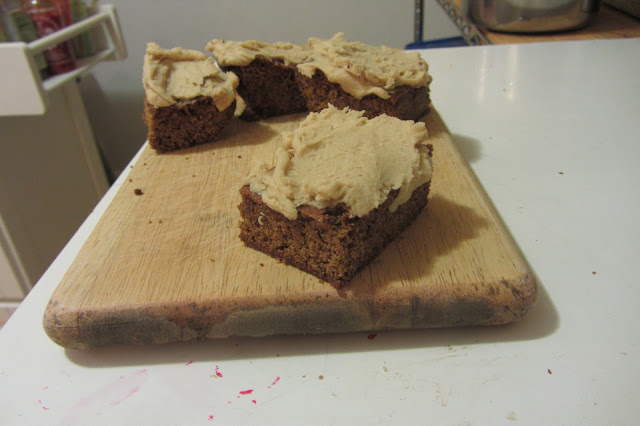
When it comes to brownies I am usually not down with the whole brownie+frosting thing, but that's probably because I like my brownies super fudgy. However these blondies are more cakey, so I am totally okay with slapping frosting on them.

Oh, and this frosting is totally not photogenic, but don't let that fool you. It. is. awesome.
I am entering these blondies in the Creative Holiday Recipe Contest hosted by Confessions of a Cookbook Queen and Cookies and Cups!

Gingerbread Blondies
2 3/4 cups plus 1 Tbs all-purpose flour
1 1/2 tsp baking soda
1 tsp kosher salt
1 1/2 tsp ground cinnamon
1 tsp ground ginger
1/4 tsp ground cloves
1/2 tsp ground nutmeg
2 1/2 sticks (20 Tbs) unsalted butter, at room temperature (see note)
1 1/4 cups packed brown sugar
1/2 cup + 2 Tbs granulated sugar
2 large eggs plus 1 egg yolk
1 1/4 tsp vanilla extract
1/3 cup molasses

Preheat oven to 350 degrees. Spray 9x13 baking dish with cooking spray or line with parchment paper. 

Mix together flour, baking soda, salt, cinnamon, ginger, cloves, and nutmeg.

In the bowl of a stand mixer fitted with a paddle attachment, cream the butter and sugars at medium speed until light and fluffy. Add the eggs and yolk, one at a time, mixing well between each addition and scraping down the bowl as needed.  Beat in the vanilla and molasses.  Reduce speed to low and slowly add the flour mixture. Mix until just incorporated. 

Pour the batter into the greased dish. It will be very thick, almost like cookie dough, but don't worry. Spread and smooth top with a spatula. 

Bake 30-35 minutes, or until the edges are golden. Allow to cool in pan completely before cutting. 

*Note: I only had 11 Tbs butter, so I substituted the rest with 5 Tbs plain Greek yogurt and 4 Tbs canola oil. Because of this, your blondies may have a slightly different texture than mine.

Caramel Frosting
1/2 cup margarine or butter
1 cup packed brown sugar
1/4 cup milk
2 cups powdered sugar

Melt butter over medium heat in 2-quart saucepan. Stir in brown sugar. Heat to boiling, stirring constantly. Reduce heat to low. Boil and stir 2 minutes. Stir in milk. Heat to boiling; remove from heat. Cool to lukewarm. Gradually stir in powdered sugar. 

Place saucepan of frosting in bowl of cold water. Beat until smooth and of spreading consistency. If frosting becomes too stiff, stir in additional milk, 1 teaspoon at a time. (I was able to skip this step because my caramel was cool enough before adding the powdered sugar)
Thursday, September 27, 2012

DIY Mug Decorating With Sharpie


I love DIY projects. This is more of a method than what you have to do. You can use any type of dish, mug, cup, bowl, whatever, as long as it can handle being in the oven and doesn't have a shiny finish. This project is super easy and now I want to decorate everything like this. Everyone needs to keep their dishes away from me, because I will totally snatch them up and decorate them for you.
This is all you need; your dish and a sharpie. Either can be any color, but I used a white mug and black Sharpie.

I used a stencil, but you can go freehand if you so chose. If you use a stencil, just tape it on.
Then start by outlining your shape/pattern.
I went over the outline a couple times, then started filling it in, being careful not to color outside the lines.
Here it is before I baked it. The light is all weird because I did this project and took these pictures at night, and there was a candle burning near by. To bake: put your dish in a 350 degree oven for 30 minutes.
Here it is the next morning after I baked it, holding my iced coffee. I kept my mug in the oven for a while, to let it cool. And you're done!

Wednesday, September 26, 2012

Chewy Pumpkin Chocolate Chip Cookies

I am so happy it's fall! Granted, fall in the South means that it's in the 80s one day, and a nice, fall-like 68 the next, but I'll take it. When we first moved from Washington, I hated summers. It was too hot, too humid, and just reminded me that we weren't in Washington anymore.
Now, summers have grown on me. It probably has something to do with the break from school, homework, and schedules, but I've also realized that I don't like the winters here. They're just too cold, and I hate freezing my butt off, especially when I'm riding.
Fall has been my favorite season for a long time, but the reasons have changed. Some of the reasons; Halloween, crunchy leaves, Thanksgiving, pumpkin, apples, and crisp air, have stayed the same. A few of my newer fall favorites; the fair (it was in the summer in Washington), sweaters, football, and basically all the food. 


Speaking of food... these cookies were delicious! I made them for a party on the first day of Autumn, but uh,  life got in the way and it's taken me until now to upload the recipe. Oops. Anyway, this is where you start, with the dry ingredients (and distorted looking toes. and a big red dog).

Then you whip up your wet ingredients in a separate bowl. This picture is so weird to me. It almost reminds me of a target or something. 
Dry meets wet! Oh, did I mention that these cookies have barely any butter? The pumpkin works as a substitute for most of it, just like you would use applesauce. I think I'm going to try replacing applesauce with pumpkin in a few more recipes this season, to see how it works.


And now we add our chocolate chips! This is only half the dough, because I made half the cookies with chocolate chips, and half without. I'd never tried pumpkin with chocolate before, so I wasn't sure how I would feel about it. Plus, I was bringing these to a party and figured some people would want chocolate chips, and others wouldn't.

The finished product... I didn't get very many pictures of the cookies after I baked them, because I was in a hurry, and I didn't want to be fondling cookies that were meant for other people too much.
These cookies are soft and chewy, and just plain yummy! I only had one of the ones without chocolate chips, but I did sneak some of the dough that had chocolate, and they were equally good. These were a hit with everyone who tried them, and they disappeared quickly! Another bonus...these are technically "skinny", but I  promise that no one will ever guess (if it gets by my little brother, it can get by anyone!)

Chewy Pumpkin Chocolate Chip Cookies
Makes 24 Cookies
Ingredients:
  1 cup all purpose flour
  1/4 tsp baking soda
  2 tsp pumpkin pie spice
  1/2 cup granulated sugar
  1/2 cup brown sugar
  1 tbsp butter, melted
  1 egg white
  3 tbsp pumpkin puree
  1 tsp vanilla extract
  1/2 cup mini chocolate chips (optional)

Directions:
Preheat oven to 350. Line two cookie sheets with parchment paper/reusable baking liners or lightly spray with cooking spray.
In a large bowl, combine the flour, baking soda, salt, and pumpkin spice; stir to blend. In a separate bowl, whisk the sugars, butter, egg white, pumpkin, and vanilla extract until light and fluffy. Add dry ingredients to wet in two parts, mixing well. If using chocolate chips, add to mixture. Measure dough with tablespoon to form 24 evenly sized cookies. Bake for 8-10 minutes. Cookies may appear slightly under-cooked, so I suggest inserting a toothpick or fork into a cookie to make sure they are done. Allow to cool before eating.

Adapted from Skinnytaste

Thursday, September 13, 2012

Chocolate Chip Cookie Dough Frozen Yogurt


Thick, creamy homemade frozen yogurt, that doesn't require an ice cream maker. This recipe is so so simple; just egg-less cookie dough and greek yogurt. AND this is so much better than normal cookie dough ice cream, because it's not vanilla ice cream with chunks of cookie dough in it, it's more like frozen cookie dough. Which is a very good, very dangerous thing. It's safe to say I will be making this again. I didn't take too many pictures of this recipe, but I didn't think they were necessary because it's so easy. First, whip up a batch of egg-less chocolate chip cookie dough.
Then, add 1 cup of vanilla greek yogurt. I actually didn't have vanilla on hand, so I just used plain and 
doubled the amount of vanilla in the cookie dough. Mine was probably a little tangier than it would be if I used vanilla yogurt, but I liked it. 
Then transfer this to a container you can put in the freezer. I used a large tupperware container, then put plastic wrap on top of the cookie dough, then put the lid on the container.
And viola! You have frozen yogurt. Anytime I've tried to make a frozen treat before, it's been slightly icy, but this is so creamy and wonderful. My favorite way to eat it is a spoonful at a time. And by a spoonful at a time, I mean it starts as one and turns into ten.

Chocolate Chip Cookie Dough Frozen Yogurt
½ cups Unsalted Butter, Softened
½ cups Packed Dark Brown Sugar
¼ cups Granulated Sugar
2 teaspoons Vanilla Extract
1 cup All-purpose Flour
¼ teaspoons Baking Soda
¼ teaspoons Salt
¾ cups Mini Chocolate Chips
1 cup Vanilla Yogurt

In a mixing bowl of a stand mixer, beat the butter and both sugars together until light and fluffy. Add vanilla and beat until combined. In a small mixing bowl, whisk together the flour, soda and salt. Add the chocolate chips and stir.
Add the flour and chocolate mixture to butter mixture and fold in gently. Then, add the yogurt and stir again.
Place in a container and cover with lid. Freeze for at least six hours.


Wednesday, September 5, 2012

Brownie Mix Cookies


 I've seen recipes for cake mix cookies all over, but I have yet to see a recipe using brownie mix! So I decided to be adventurous and experiment by making my own. Brownie mix cookies have probably been done before, buuuut I've yet to see or hear about them. Granted, I didn't look for any recipes, so I can't be sure. Anyway, let's get started!

Preheat your oven to 350 degrees, then throw an 18 oz box of brownie mix, 1 softened stick of butter, and 1 large egg in a bowl.
Then mix that together on low speed for a few minutes. I used my electric  mixer, but this could just as easily be mixed by hand! I noticed that there was still a little brownie mix at the bottom of my bowl that wasn't mixing in, so I added about 1/8 c water. You may or may not need to add water, but if you do, just add as much as you need. You're dough should look something like this:
Then scoop out your dough and plop it onto an ungreased baking sheet. Scoop dough balls as large as you like, but I used a teaspoon to make smaller cookies, because the dough is so rich. Just take into consideration that these cookies are going to spread a lot when you're placing the dough on the baking sheet. Bake for 10 minutes and voila, you have these lovelies.

 The cookies will be pretty soft when you first take them out, so just let them cool for a minute before you try  to take them off the tray. When they first come out of the oven, they'll be very chewy, but after they cool off they should be crispy on the edges and nice and chewy on the inside. They're yummy (and I don't particularly like crispy cookies!) and so easy to throw together. I have a strong feeling I'll be making these again.

Crispy Brownie Cookies
adapted from busycooks.about.com
1 18oz box brownie mix
1 stick butter, softened
1 large egg
Preheat oven to 350 degrees. In a large bowl, combine all ingredients at low speed until dry ingredients are moistened and mixed thoroughly. Drop dough onto ungreased baking sheets. Bake 9-11 minutes. Allow cookies to slightly, then transfer to cooling rack and allow to cool completely.
Note: The brownie mix I used had a packet of fudge included with the mix. I did not use this, but feel free to experiment!

EDIT (9/6/12): I had one of these cookies after it had been left for about 20 hours on a cooling rack wrapped in a dishtowel, and it was chewy! Apparently after a while, these cookies turn chewy again, and are even better than before!